Items posted on the main page are available for purchase unless otherwise indicated. If you'd like to purchase an item shown, send me a message indicating which country you live in and I'll quote you a shipping price. All payments are processed through Paypal only. If you're looking for a custom item, let me know the specifics and I'll quote you a total price. Custom items typically take 6 weeks to produce after payment is received. Keep this in mind when asking for custom orders.

Friday, December 28, 2012

Vintage Patterns: Should I Use Vintage Notions?

Strictly speaking, you don't have to use vintage notions when making a vintage garment. Modern notions work just as well. However, antique trim, piping, and even buttons are a nice touch, adding authenticity and beauty to your garment. If you do wish to use vintage notions, be prepared to spend some time looking for them. You may have to check online or visit flea markets to get what you need, and you'll probably have to pay more than you would for modern sewing notions.

If you do decide to use vintage sewing notions, visit yard sales and flea markets. They'll often have things you wouldn't have thought of. But make sure to check the condition of each item, especially at yard sales. Sometimes the item you see looks good but is really unusable. Ask questions, and don't be afraid to walk away and look elsewhere. You can also check online. Ebay sellers usually have something worth buying, so check weekly to find what you need.

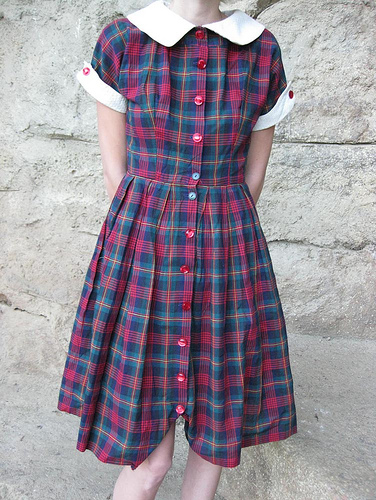
Many vintage patterns call for fabric-covered buttons or belts in their construction. In this case, you can probably use modern notions. Most fabric stores offer these items. If they don't, they can usually order them or at least help you find a retailer who does carry them. Once applied, a modern fabric-covered button looks much like a vintage one, so don't worry about these items too much.

One of the questions I'm asked about frequently is the use of hook-and-eye or snap closures in vintage patterns. Back in the day, these were the closures available to anyone wishing to make their own clothes. They didn't have zippers. If they did, they weren't readily available and came in limited sizes. We have more variety when making clothing today. It's not difficult to use an invisible zipper in a vintage pattern. They can usually be stitched in place of the closure the pattern indicates. Of course, if you're hoping to create an authentic vintage garment, you'll have to use vintage closures.

The choice to use vintage sewing notions is yours. They may be a little more difficult to work with, but the result is well worth the effort.

Friday, December 7, 2012

Vintage Patterns: Choosing Fabric For Your Vintage Sewing Patterns

Choosing a fabric to sew a vintage garment is much the same as choosing a fabric for a more modern garment. You should first take a look at both the pattern envelope. Pay particular attention to the design illustration. You'll want the drape of the fabric to match the drape of the illustration. A soft gown shouldn't be made of an upholstery fabric, after all.

You might be tempted to search out vintage fabrics, but modern fabrics are more versatile. One of the best things about these newer fabrics is that many of them have a certain stretch factor. Any fabric with a hint of spandex will add extra comfort to a vintage pattern. Since most vintage patterns have little wearing ease, this can be welcome and sometimes even necessary. Look for cottons (for lighter garments) and wools (for heavier garments) with just a touch of spandex for ultimate comfort. You might also try polyester if you like the feel of that particular fabric. Polyester is especially suited to patterns from the 1950s and 1960s, but cotton is a perfect alternative. You might even try silk for more delicate patterns such as gown and blouses.

If you absolutely have to have vintage fabrics, you really should stick to the types of fabrics indicated on the pattern envelope. To find these vintage fabrics, check out eBay and Etsy. Sellers on both sites often have fabrics for sale. Bear in mind, however, that most vintage fabrics will be only 35" to 39" wide. This means you'll have to purchase a little more fabric than you're used to so you don't run short. A little extra is probably a good idea, especially since you might not be able to get that fabric again.

In most cases you can use modern fabrics. If you like a particular fabric and it's about the right weight, you can probably use it for your vintage project.

Friday, November 30, 2012

Vintage Patterns: Following Dated Directions

Vintage patterns are very like modern patterns in one way -- some are easier than others, and some are downright difficult even for an accomplished sewer. But there is one important difference that should be addressed before attempting a vintage sewing pattern. Vintage patterns as a whole assume that you have a greater degree of sewing knowledge that most modern patters do. Most vintage patterns will have less detailed instructions and will merely say things like "insert zipper" without telling you how to do it. This can create confusion when it comes to completing a vintage sewing project.

There's yet another problem with vintage patterns. Many of the earliest patterns are perforated rather than printed on the paper, meaning that it becomes necessary to basically guess how the pattern pieces go together based on the perforated holes. This problem can be averted in the future by first tracing the pattern onto tracing paper and writing notes on the pattern pieces for future reference.

If you're new to sewing, get yourself a basic sewing manual before attempting a vintage pattern. I like The Sewing Bible: A Modern Manual of Practical and Decorative Sewing Techniques or even Reader's Digest Complete Guide to Sewing, but you may have your own preference. If you can find an older sewing book, you will have a greater chance of deciphering vintage techniques. Even an experienced seamstress may benefit from having a book around to help explain unusual construction techniques, such as gussets, that can be found in vintage patterns.

When you're looking for vintage patterns, try to avoid those created by well-known designers. They're incredibly complicated and difficult to complete even for an experienced sewer. Instead, look for patterns by Butterick or Simplicity which are marked "Quick" or "Easy." These will typically be easier to complete than more complex patterns.

If you purchase a pattern and find it has missing or damaged pieces of instructions, try Pattern Rescue. This site is dedicated to preserving and restoring vintage sewing patterns and can be a great resource for anyone having difficulties with vintage sewing patterns.

Friday, November 23, 2012

Vintage Patterns: Preserving Your Vintage Patterns

Vintage patterns can be great fun, but they're also incredibly fragile and usually difficult to replace if damaged. You may not want to use the original pattern for fear of destroying it. Instead, trace a copy of the pattern before using it. You can do this on tracing paper, but if you're hoping for a durable copy of the pattern, use interfacing or speciality gridded tracing paper. These are a little more expensive, however, so you might want to stick with tracing paper, butcher's paper, clean paper bags, or even easel paper. All of these will work.

When tracing your vintage pattern, copy all marks and symbols exactly as you see them. You can make adjustments after you've copied the original pattern as it appears. You can also write specific notes about adjustments or ease on the copied pattern itself without risking damage to your original vintage pattern.

Once you've copied your vintage pattern, store the original in a cool, dry place that is far away from any direct light. While it's tempting to put your patterns in plastic bins, don't. Plastic bins trap moisture and can degrade the paper the pattern is printed on. If you're looking for storage options, look at bags and boxes designed to store books and other paper items for long periods of time. These are created to allow airflow and will help keep your vintage patterns in top condition.

Friday, November 9, 2012

Vintage Patterns: Sizing a Vintage Pattern

Vintage patterns are much in demand. Something about them attracts the novice and the expert alike. But when you look at vintage patterns, you'll notice that the sizes are not anything close to what we wear today. This makes it difficult to buy a pattern in your size. There's more to sizing a vintage pattern than simply looking at a number, so do your homework first.

Sizes are not the same today as they were 80 or even 40 years ago. So the safest way to pick the right sie is to ignore the size number completely. It's just a number and means nothing. When looking at a vintage pattern, first measure your chest or bust. Measure the largest point on your chest or bust and compare it to the measurements for the pattern you'd like to get. Then purchase the pattern that is right for your measurements. That's what's important.

But you also have to understand wearing ease. This is the difference between the garment measurements and the body measurements. To give an example of this, a pair of pants with a 32" waist might actually be designed for someone with a 30" waist to allow for comfort and movement. Vintage patterns have less wearing ease than their modern counterparts. You may have to add ease to make the garment comfortable. Consider sewing a test garment out of a cheap fabric to see if you'll have to make some adjustements (or even use a larger size).

Friday, November 2, 2012

Vintage Patterns: Purchasing Vintage Patterns

There's been a lot of interest in vintage clothing over the last few years. This interest has extended into the world of sewing. People with a sewing machine stashed in their basement are gathering their supplies and hunting for vintage patterns. But before you grab any old pattern from any old seller, there are some things you should know about purchasing these vintage sewing patterns.

First of all, if you've never used vintage patterns before, or are unsure what exactly makes a pattern vintage, buy only from a vendor who sells only (or at least mostly) vintage patterns. This person should be able to answer any questions you might have and can give you important information about bust measurements and other specifics.

Ask if the pattern is uncut. An uncut pattern is easier to work with because you won't have to deal with the alternations made by another sewer. If the pattern has been cut, ensure that all the pieces are there and relatively undamaged. Using a pattern that has been cut is fine, but you don't want to get it home only to realize that you're missing several key pieces.

Finally, if you have no familiarity with vintage patterns, start with something cheap and easy. Aim for a pattern that costs you between $7 and $15 dollars. The fewer number of pieces the better. Once you have some experience with vintage sewing patterns, you can venture into more complicated styles.

Friday, October 26, 2012

Working With Knitted Fabrics: Stabilizing Seams

Knits can be tricky and don't always behave the way other fabrics do. Seams can present a problem when you run them through a sewing machine, but you can fix this with a simple piece of interfacing. To stabilize a seam when working with slippery or lightweight knits, cut a narrow strip of lightweight interfacing. No more than an inch in width, preferably. Position the strip along the seam allowance and stitch the seam through all the layers. This will prevent the delicate fabric from being pushed beneath the machine throatplate during sewing.

Friday, October 19, 2012

Working With Knit Fabrics: Finishing Edges

Knits are different than other fabrics. They are constructed of interlocking loops, and as such they do not behave the way other fabrics might. When working with knitted fabrics, you have to take these differences into account. Because knits are formed of these all-important interlocking loops, the raw edges don't unravel and typically don't require much finishing. Sometimes trying to finishing seams and edgins only adds unnecessary bulk and ruins the line of the garment.

So how should you finish the seams of projects constructed with knits? This will depend on what you're making. Take a clue from clothes hanging on the rack at your favorite store. Many of these ready-to-wear items don't finish the edges at all, leaving them raw and so reducing bulk. You can follow suit. Or, if you really can't stand leaving raw edges, try a zigzag stitch. These can finish the edge without adding much bulk at all.

Friday, October 12, 2012

Working with Knitted Fabrics: Sewing Smooth Knit Seams

There are many ways, methods, and techniques for stitching smooth knit seams. These vary by fabric type and machine tension. Some machines will be equipped with speciality stitches that stretch a fabric during the stitching process, and if your machine has this setting, you should use it for knit fabrics. It's usually marked as a knit setting on the sewing machine or in the manual that came with the machine. This setting will allow you to create smooth seams.

But what if your machine doesn't have this very specific setting? You can still get decent seams on your own sewing machine. Try using a longer stitch when sewing the seam, but make sure the fabric doesn't stretch while you're doing it or you'll end up with a bunchy seam. Don't try to mimic the knit setting if your machine doesn't have it. Work with what you have instead.

You might also try a very narrow zigzag stitch (which is my favorite alternative) or using a serger if you have one. Test the various methods on scraps of fabric to determine which is the best for the specific fabric you're using. Remember that all fabrics are a little different, so always do a little test run before working with your actual project.

Friday, October 5, 2012

Working With Knitted Fabrics: Using Interfacing With Knits

As much as I detest working with interfacing, sometimes it's inevitable. Sometimes you need to stiffen up your fabric, or just add a little more stability. Knits, like other fabrics, can often benefit from a little more stability, depending on the project, of course. Unlike other fabrics, however, knits require a very specific interfacing. Woven and nonwoven fusible interfacings are simply too rigid and usually cause the knit fabric to bubble or pucker after fusing. And after fusing is too late to fix it.

Prevent this problem by choosing your interfacing with care. Tricot knit interfacing, available at most fabric stores, is lightweight and stretchy. This makes it less noticeable when fused to knit fabrics. It also won't damage knit fabrics the way other fusible interfacings can. So do yourself a favor and choose the right interfacing based on the fabric you're using. Don't just grab whatever happens to be on the shelf.

Friday, September 28, 2012

Working With Knit Fabrics: Supporting Your Fabrics

I recently returned back to my home sewing center with a friend. We were carrying several hundred dollars of new and very pretty material. The phone was ringing, so my friend gathered up the material, assured me she would put it all away, and ushered me toward the phone.

Well, it was a lengthy phone call. My friend wandered out of my storage room before I managed to get off the phone. When I did finally hang up, we visited for a while and she left to collect her kids from school. I went up to my office to answer a few e-mails. It was the next morning before I went into my storage room to gather up some fabric for my next project. And I could have slapped my friend.

The fabrics were put away all right. But they were all hanging. All of them. Now, it's perfectly find to hang fabrics. I do it all the time. But there are some fabrics that you must not hang. Ever. But there was a bolt of beautiful rose fabric hanging over one of the tower rods. The problem? The beautiful rose fabric was a knit. That's why I have shelves.

Knits stretch. They're designed for it. It's what allows knitted fabrics to conform to the body. They're great for making form-fitting garments, but this stretch has a downside. Knitted fabrics have a tendency to grow and stretch when left hanging. So the overnight hang on the towel rod? Well, I can't use that bolt of fabric, at least not for its intended purpose.

It would have been fine if the fabric could regain its original shape. But the "growth" of knitted fabrics can cause inaccurate cuts, distorted pattern pieces, and wavy seams. And it's not reversible. And it's not just hanging over night that causes this problem. You can ruin a delicate knit simply by allowing the fabric to hang over the table edge as you cut out a pattern piece.

To avoid this particular problem, always ensure your knitted fabrics are supported. When you're cutting fabrics, pile the excess fabric on the edge of the table instead of letting it hang. When stitching a seam, support all of the fabric on your lap or on the table rather than allowing it to droop off the sewing surface. And when storing knits, fold or roll them carefully and place them on a shelf. Don't hang them. You don't want misshapen fabric when you sit down to sew.

Friday, September 21, 2012

Working With Knit Fabrics: Needles and Pins

Yep, I'm still working with knits over here. Turns out there was more to do than I'd thought. And while sewing yesterday, I remembered a tip I gave a couple weeks ago. The one about not using pins to hold the pattern onto the fabric for fear of damaging your knits. Well, I think maybe I should go a little further with that particular tip. Why? Because pins aren't the only thing that can cause knitted fabrics to run or tear.

When you run a piece of fabric through your sewing machine, you use a sewing needle. This needle can and probably will pierce the fabric in just the wrong place. This will cause your seam to split or pop and the fabric might even be ruined. So how do you avoid this and still use knitted fabrics in your projects?

To avoid skipped stitches and popped seams, switch to a ballpoint needle. You can get these at any sewing supply shop and most craft stores. They're often labelled as being "for knits" so they're not hard to find. Ballpoint needles have a rounded tip and are designed to slip between the knit fabric loops instead of piercing the fabric itself. You should also consider using a polyester thread when working with knits. Polyester thread is both stronger and more flexible than cotton, so it will stretch with the fabric instead of snapping as cotton threads might.

So before you start working with knits take the time to get the right supplies. It wills save you the grief and aggravation of a ruined project or two.

Friday, September 14, 2012

Working With Knit Fabrics: Selecing a Fabric Based on Stretch Factor

Knit fabrics are tricky because different knits stretch differently and the ability to recover after stretching is not consistent between fabrics. Commercial patterns that recommend knit fabrics are designed for different degrees of stretch, so check the pattern envelope for the appropirate stretch gauge before selecting a fabric.

It's also important to know what kind of stretch the fabric you're selecting might have. There are basically two kinds of stretch. The fabric might only stretch horizontally (called two-way stretch) or it might stretch both horizontally and vertically (called four-way stretch). This can be determined simply by picking up the fabric and stretching it both ways. These are not usually interchangeable. For example, if I'm making a fitted gown out of a knit fabric (which I just did yesterday), then you probably want a fabric that has only horizontal stretch. After all, you may not want the gown to stretch downward. Horiztonal stretch will allow the gown to cling to the body without hanging ... oddly after a few washes. But a four-way stretch might be better for a slip cover or tight leggings. It all depends on the final product, so test before you buy.

Also pay attention to the fabric content. Knit fabrics made of synthetic fibres tend to have better recovery than natural fibres, so if you're hoping to make something that will keep its shape after many wears, look for a fabric with at least some synthetic content. A gown made entirely of wool, for example, will eventually lose its shape.

The bottom line is you absolutely must know what you're making with a knit fabric before you grab it off the shelf. Stretch factor and fabric content are very important when you decide to work with knit fabrics, so consider these things before you go out fabric shopping.

Friday, September 7, 2012

Working With Knitted Fabrics: Pinning a Pattern

So I'm still working on the projects on my plate that require knit fabrics. I was doing this while I had a friend over. She was just sitting there watching me lay out a pattern on the fabric, a pretty pink knit that's becoming a gown, talking about the nonsense women talk about when they find themselves alone.

At some point, she cocked her head to one side and really focused on me. "Why are using little weights? Why don't you just pin the pattern in place?"

And so there was born my next tip for working with knitted fabrics. Never, ever pass a pin through a knitted fabric, especially if you're working with drapey knits such as slinky or matte jersey. Why? because if your pin goes through the knit instead of between the loops, you can end up with tears and runs in the fabric. Besides, pinning through knit layers often causes the fabric to shift, resulting in fabric pieces that aren't quite perfect.

What can you do instead? Use little weights to hold the fabric and pattern pieces so that they don't move. Or cans from the kitchen. Or whatever you have lying around. I bought little weights from the local hardware store, but you probably have enough small items in your home to make due if you don't work with knits very often. If you do frequently work with knitted fabric, you might want to invest in a few heavy weights. But to avoid damage to your fabrics, you might want to stitch little pouches for the weights. It never hurts to be cautious.

Friday, August 31, 2012

Working with Knitted Fabrics: Cutting Knit Fabric

Okay, I lied. Except maybe I didn't. Last week I said that I'd be knitting for a few weeks and so all my posts would be about knitting. But somewhere during the course of the week I set my knitting aside and picked up some knit fabric. I have a few projects on my plate, from gowns to cloaks to wedding gear requiring knit fabrics, so I decided to get back on track.

As a result, my tip this week involves working with knit fabrics. So, maybe I didn't lie last week. Knitting and knit fabrics are closely related, after all. Slight shift, but not by too much.

Anyway, one of the first things you do (though not THE first) is cut out your pattern pieces. But this can present a problem when using knit fabrics. Accuracy is of the upmost importance when cutting knits. When you're paying out your pattern (assuming you're using a commercial pattern), you'll want to follow the "with nap" instructions. Don't get creative. This layout is specifically designed for those fabrics that won't look the same if you hold them upside down. For example, velour catches the light different depending on the direction of the fabric. You certainly don't want your garment looking ... odd. Yes, odd is a good word. Odd and silly.

Once you have your fabric pieces laid out, make sure you use very sharp, burr-free scissors. Better yet, pick up a new rotary cutter blade to prevent snags, stretching, and bunching. You can stick with scissors, but only if they're very sharp. Practically new would be my suggestion.

As your cutting, don't stretch the fabric. Yes, I know holding the fabric taunt helps with accurate cutting, but that's only for woven fabrics. Knit fabrics don't get taunt. They stretch. And if you cut the stretched fabric you'll only end up with misshapen pattern pieces. So don't touch the fabric while you're cutting if at all possible.

Well, that's my tip for this week. Who knows what my tip for next week will be? If I'm still working with knits, it will probably be about knit fabrics. If not ... you'll have to tune in to find out.

Saturday, August 25, 2012

Knitting Tips: Choosing a Knit

I've been knitting a lot lately and it's caused me to think about all those little questions I've been asked over the years. Knitting is an art and takes some practice, and a tip here and there can't help. So over the next few weeks I'll be posting a few knitting tips. How many? I don't know. One a week until I decide knitting is boring me and I wander back toward my sewing machine. 8, maybe 10. Possibly as many as 12. But all the tips will be based on questions I've been asked or little helpful things I've discovered in the years since I was a little girl at my great-grandmother's knee.

This week's tip involves choosing between a single-knit and a double-knit. To know which knit to use, you'll have to know what you're making. Each fabric will behave differently. single-knit fabrics such as jersey are lightweight and have a great deal more stretch. Since the yarn forms a single layer of interlocking loops, there is a clear right and wrong side to the fabric. And because of the stretch, they're great for everyday items such as form-fitting shirts and dresses. But not so great for a bag, scarf, or anything that needs to keep its shape or keep your warm.

Double-knit fabrics have a double layer of interlocking loops. Fabrics made in this manner, such as interlock, do not have a visible right and wrong side. This type of knit is perfect for scarves and blankets that might be viewed from both sides. The fabric is heavier and more stable and so works well for hats and mitts as well. But it is a very warm knit and garments made of double-knit fabrics are usually too warm for summer wear.

So deciding on a double-knit versus a single-knit requires you to know exactly what you're making. Of course, if you're following a set pattern, this decision has probably been made for you. But when I'm knitting, I don't usually work from a pattern, leaving me to deciding on a knit based on the purpose of the finished product.

Friday, August 17, 2012

SINGER 4423 Heavy Duty Model Sewing Machine

Every once in a while I have to get a new sewing machine. Let's face it, with everything I sew, machines eventually need to be replaced. They tend to not be worth fixing, so a new one every couple years is certainly in order.

This year, I had to replace my old machine. Okay, so it's not that old. I bought it only two summers ago. But the motor had an unfortunate accident and would cost more to fix than a new machine would, so I went shopping for a new one. I tested out several models before finding one I absolutely loved.

The SINGER 4423 Heavy Duty Model Sewing Machine was perfect for my needs. It was high speed, meaning I could get the professional results I pride myself on as quickly as possible. And when they said heavy duty, they meant heavy duty. It handles even my largest projects with speed and precision. The fabric feeds smoothly and it's incredibly easy to set up. And the SINGER 4423 Heavy Duty Model Sewing Machine has 23 built-in stitches, which is a couple more than my old machine, giving me more variety.

But the best thing about this machine is its ability to handle heavy weight fabrics, or even multiple layers of heavy weight fabrics. My old machine was heavy duty, but it couldn't hold a candle to this thing. So if you're looking for a new machine for more than casual sewing, you might want to try the SINGER 4423 Heavy Duty Model Sewing Machine.

Friday, August 10, 2012

How to Fashion Design Series with Bob Martin

I love products that help people unfamiliar with sewing methods and techniques learn something new. But what I love even more are products that are useful for both the novice and the seasoned pro. This is what I found in the How to Fashion Design Series with Bob Martin.

This product explains the process of designing and constructing a garment from start to finish. There are three DVDs, each focusing on a particular step of the process. The first DVD explains garment construction. You can learn to sew seams and will actually construct a garment as you follow along.

The second DVD gets into fashion drawing. These lessons start at the very beginning, so it doesn't matter if you're artistic or not. You can still learn to draw out unique and beautiful fashions. This is probably my favorite of the DVDs in this set.

But let's not forget the third and final DVD. During this series of lessons you will be introduced to the entire design process. Do you want to create your own designs either for your own use or perhaps as a way to start your own business? This is the DVD for you (though you'll need the other two as well).

The entire series is well worth the investment for anyone interested in more than simply following a pattern.

Friday, July 27, 2012

Project Runway Fashion and Figure Drawing Set

I like to do more than sew. I like to design. I mostly design clothing, but I will occasionally design other items. I usually just use a pencil and a sketch pad when designing dresses and other garments, but this isn't always an easy thing to do for a beginner. In fact, a creative friend of mine wanted to begin designing, but she needed a little more help than pen and paper could provide.

Imagine my delight when I came across the Project Runway Fashion and Figure Drawing Set. This set, which comes with a 12" wooden mannequin, also has step-by-step instructions for designing the garments of your dreams. In addition, it comes complete with paper, colored pencils, and eraser, and a sharpening paddle. In a word, it's perfect for the budding designer.

My friend certainly loves it and is using it to learn to design. It can also be used by younger children. I would recommend it for anyone under the age of 8 years, and certainly not for under 3 years due to small parts (choking hazards, you know). If you're looking for a product that helps you learn a little about fashion design, this should be on your list.

Friday, July 20, 2012

Colette Patterns

As a seamstress, I use both my own sewing patterns and those patterns created by others. For this reason, I'm always on the lookout for excellent patterns. I thought I had all the best sewing pattern sites bookmarked until I came across Colette Patterns. These clothing patterns were absolutely perfect. I couldn't believe I hadn't found this site before now.

The patterns are breathtaking with easy to follow instructions. They're vintage-inspired, but designed to be comfortable for modern men and women. Beautiful and unique, these patterns have served as inspiration for some of my own newer creations.

It's not just the styles that caught my attention. It's the quality of the patterns themselves. The patterns I've ordered have come in printed booklets with linen covers and even stitched bindings. A very nice touch and reminiscent of days gone by. They even include a glossary of sewing terms so even beginners will be able to follow the included instructions.

I love the patterns and recommend them for anyone interested in patterns that appear vintage but are much more comfortable and designed for the modern wearer.

Friday, July 13, 2012

Sizzix Big Shot Pro

I'm always looking for products to make my life easier, so when a friend suggested I try her Sizzix Big Shot Pro for all my cutting and embossing needs, I jumped at the opportunity. I fell in love immediately with the versatile machine. I could suddenly personalize garments, home-decor items, and all manner of accessories quickly and easily. It cut my fabric into applique shapes without any fuss and was generally a joy to use.

The Big Shot Pro features a 13" wide opening. This means I can use it to cut or emboss virtually anything. For a few projects I did require some of the optional accessories, which my friend luckily had already. These accessories widened my ability to create new and unique items. Though I mostly used the machine for garments (since this is the focus of my business), I also tried it out when making accessories for my home. Mostly pillows, and let me tell you, I created some lovely pillows with this machine. Most of them have since been stolen by my friends and family, so it looks like more pillows are in my immediate future.

I was so happy with the Sizzix Big Shot Pro that I couldn't help but purchase my own, plus accessories. It was well worth every penny, and I'm currently designed new and unique products with this machine in mind.

Friday, June 29, 2012

Kreinik Metallic Threads

I love unique products that are easy to work with and enhance the beauty of my projects. So when I found the vibrant metallic threads from Kreinik, I was overjoyed. These threads glitter and sparkle, adding pizzazz and vibrancy to many of my projects. I use them for embroidery or even just to sew a hem and am always pleased with the results.

These threads come in many colors and are available in a variety of sizes to accomodate all your sewing and craft needs. Choose from textures such as ribbon or braid and watch your sewing and craft projects come to life.

These threads can be a little irritating to work with when they curl or twist, but there are a couple simple tips I've discovered that can solve both these problems. Neither of these tips apply when using Kreinik metallic threads in a sewing machine. First, when taking the thread off the spool, wet it just a little. That will get rid of the curl. And if you find your thread twists as you work, try using shorter lengths. This will also help preserve the quality of the thread itself.

These and other specialty threads are a little more expensive than your average sewing thread, but they're well worth the cost whenever you need something with a little spice.

Friday, June 22, 2012

Susan Winget Fabric Collection

I'm always on the lookout for beautiful fabrics that are easy to work with, and I love prints most of all. So when I stumbled on to the Susan Winget Fabric Collection, found at Joann Fabric & Craft Stores, I fell in love. these fabrics are 100% cotton, so they're easy to work with and they can be used for garments, home decor projects, quilting, and so much more. I use them to make summer dresses and pillows, though I'm sure I'll find even more uses for them as the summer wears on. They also iron well on a low setting, making life easier for me since I absolutely hate wrinkles.

So if you have the time, search through some of the available patterns and consider ordering some of your favorites. My personal favorite is pictured here, called Butterfly Drawn to the Light, but there are many other choices for anyone interested in lovely fabrics. Some of my favorites include:
But these are only a few of the fabrics I've used in my summer projects. I strongly recommend them for anyone interested in wonderful fabrics that are easy to work with. They'll enhance your sewing projects and make you love fabric shopping all over again.

Friday, June 15, 2012

A Creative Sewing Box and Storage Solution

Traditionals sewing boxes and kits are simply not that large. They'll hold a few notions and maybe even some scraps of fabric, but forget storing patterns or larger pieces of fabric in there. If you love to sew, you probably have more supplies and fabrics than you can store in that sewing box, so you end up with bags, boxes, and storage tubes filled with supplies all over the house. Hey, it happens.

But there is a creative solution, though you'll have to go to your local hardware store to get it. Invest in a giant tool box. One of those ones with a dozen drawers that rolls around on wheels. These are often called tool chests or tool cabinets, and some of them have power outlets, radios, and even little mini refrigerators (though you might not need one that elaborate).

These chests have drawers for all your notions and supplies, and you'll probably have enough space for frequently-used patterns and fabrics. And they come on wheels so you can move them when you need to. If you really need the storage space, you might want to get two!

Friday, June 8, 2012

Creating Multiple Sewing Stations

Have you ever been ironing a piece of fabric and needed scissors but you simply couldn't find them? It's happened to me, and on more than one occasion. This situation inevitably leads to a frantic hunt for sewing scissors. Or maybe you need your seam ripper while sitting at your sewing machine and you just can't remember where you left it. If this happens to you, you might want to considering setting up and organizing separating sewing stations.

Start with your basic sewing station. The sewing machine. If at all possible, set it up so you don't have to constantly take it down. A separate table is ideal. Keep a selection of pins and pressure feet here. Also thread and all the needles for your sewing machine. And don't forget a pair of scissors and a stitch ripper.

When you're sewing, you'll often need to iron fabric, both before you start using it and during your project. So you'll need an ironing area. Stock this area with pins, a lint roller, and a quality hem gauge. And a pair of scissors so you don't have to run to your sewing area every time you need to snip a thread.

Cutting tables are ideal for laying out your fabric and cutting your pattern pieces. At this table, you'll also want marking tools such as pens and your marking wheel. Also put all your rotary cutters in this area, even if you don't use them very often. At least you'll know where they are when you do need them. And, of course, a quality pair of sewing scissors.

These are your three basic sewing stations. Keep them separate and well stocked and you'll find your projects are suddenly completed more quickly and with greater efficiency.

Friday, June 1, 2012

Keeping Track of Sewing Supplies

Sewing supplies have a way of getting away from you. Pins roll onto the floor. Scissors and marking pens get lost under swaths of fabric. Beads and buttons end up all over the place. And you never can find that sewing machine manual when you need it, though it will turn up when you don't.

Everyone who sews needs to track of those sewing supplies. And different supplies require different solutions. For all those little pins and whatever other metal tools you might have, try magnetic trays. You can find these simple items at your local hardware store and they'll keep your pins from rolling away. And, if the tray is knocked over, most of the pins stay in the magnetic tray.

But a magnetic tray doesn't help when it comes to marking pens and cutters. So try recycling an old silverware basket, the kind that come in most dishwashers. You can use these baskets to hold marking pens, scissors, cutters, glue sticks, and other supplies. It works magic and allows you to keep your sewing area organized.

Then there are those tiny little items such as buttoms, crystal, trim, and even the pressure feet from your sewing machine. While some of these might fit in the silverware basket or conveniently stick to the magnetic trays, some of them are just awkward. try an old fishing tackle box. These boxes fit almost anything and tend to conserve space better than traditional sewing boxes. They're also cheaper.

And what about all those manuals, supply instructions, magazine article, printouts, and other random papers? Don't toss them in a drawer. They'll get crumpled and perhaps even ruined. Instead, invest in a good-quality three-ring binder and some inserts. Also pick up a few pockets to fit in your binder. This way, you can store all the paper you need in one convenient location.

Keeping your sewing area organized will cut down on the time you spend searching for the items you need. Get creative and find unique ways to keep track of all your sewing supplies and you'll find your life gets a lot easier.

Friday, May 18, 2012

Remembering Those Serger Settings

New fabrics are always fun to work with. I love to bring home a new fabric. The first thing I do is find that perfect serger setting and serge all the raw edges. This is an important step before washing the fabric since it helps prevent the edges from fraying. Then, I'm ready to use the fabric for whatever project is necessary.

But the second time I buy this fabric, I just want to get down to business. I don't want to spend maybe 15 minutes finding the perfect serger setting. I just want to serge the edges and wash the fabric. The problem is each fabric has a unique serger setting. So I've developed a little method to help me keep track of the many different settings I have to use. I record that perfect setting and write in on a sticker. Then I take that sticker and stick it firmly on a small scrap of fabric. Now, when I begin a project, I know exactly what setting that fabric needs. The problems are solved and my sewing projects are completed with less aggravation and far more speed.

Friday, May 11, 2012

Keeping Sewing Cords Under Control

If you're anything like me, you don't just have one sewing machine with a single cord. It can never be that simple. There's the serger, iron, and whatever other small appliances you need for your particular sewing project. And all those cords get in the way and tangle in the knees when I'm sewing. It's very irritating and quite easy to solve.

I picked up a couple 2" magnetic bulldog clips at the local office supply store. I do a lot of shopping for my sewing supplies over there. These clips just about saved my life. I use them to secure the many cords to the underside of the sewing table. Of course, you need a metal table (or metal on the table) for this to work. Once clipped, the cords are kept away from my legs while I'm working, don't tangle with themselves, and are not in the way. Therefore, I don't trip on them as I move around the room, and my children and dogs don't get tangled and pull a heavy sewing machine or iron down on top of themselves.

Friday, May 4, 2012

Steadying Sewing Spools

Have you ever bought thread spools with a center hole too large to fit on your spool holder? Well, I did. The colors I needed didn't come in the size that would fit my holder. When using these spools, they rattle all over the place and sometimes even fly off the machine. A quick fix was certainly in order.

I had two options. I could do as a friend of mine suggested and unroll the entire spool then reroll it on a spool that fits. I keep the old spools for my children to use in their many craft projects, so I had plenty of spools around. However, even using the machine, this would take a while and I'd have to do it again every time I purchase this particular sized spool. Not my idea of a good time.

Instead, I hit the craft store and went immediately to the wooden beads section, spool firmly in hand. After a little trial and error, I found a bead that fit snugly into the thread center hole. An electric drill helped me to drill a hole though the center of the bead to fit the spool holder perfectly. The best thing? I'm keeping the beads. Next time I have to buy that sized spool, I'll have a bead all ready to go.

Friday, April 27, 2012

Repairing Rips in Pattern Pieces

There's nothing more annoying that cutting out a purchased sewing pattern with great care and ending up with a rip while you're pinning the pattern piece to your fabric. Or when you're removing the pattern piece from the fabric. However you end up with a tear, torn pattern pieces can be easily repaired in very little time.

The first instinct of many people would be to grab the nearest roll of tape and just tape up the tear. This works, but only as long as you don't apply any heat. Traditional tape melts when ironed, ruining the pattern, your iron, and and fabric the melted tape happens to touch. Instead of using any old tape to repair rips in sewing patterns, purchase paper bandage tape. This tape will hold your pieces together, but it can also handle heat. You can iron the taped areas just as you can the rest of the pattern. Keep a roll of paper bandage tape handy for repairing tears in pattern pieces.

Friday, April 13, 2012

Building Your Own Ironing Board


This week I was ironing fabric by the masses. I have a lot of sewing to do as graduation season approaches. A lot of girls need their grad dresses. But I quickly found myself frustrated by the small size of my oversized ironing board. I never can get enough raw fabric on the board to save myself any amount of real time. I also can't find an ironing pad large enough.

So I deciding to make my own ironing board. I took a large piece of plywood and layered wool on one side to create a 1-inch pad. I covered the entire thing in a solid cotton fabric that was large enough to stretched over the wool and around to the underside of the board. I secured the cotton with hook-and-loop tape. This would allow me to remove the cotton and wash it if necessary.

Finally, I took the board and positioned it on two large construction sawhorses. I could have used anything, but I had two sawhorses that weren't being used for anything. I didn't attach the board to the sawhorses, simply because I wanted to be able to take it down and store it when I wasn't using it.

Now I have a large ironing board that accomodates most of my fabrics and really any pattern piece. Problem solved. Crisis averted. Ironing large pieces of uncut fabric is no longer a cause of frustration while I'm working. And it didn't cost me anything, because I had all these things around the house somewhere.

Friday, April 6, 2012

Steadying a Moving Serger

I was over at a friend's house the other day, talking about sewing and demonstrating projects, when she pulled out her serger. As she used it, it virbrated and jumped all over the table. Mine never does that. It took me a moment to notice the difference. My serger is steadied with ... kitchen sponges.

So I shared my tip with her right at that moment, just like I'm sharing it with you now. To keep your serger from vibrating and boucing on your work table, get two rectangular kitchen sponges and cut them in half so you have four squarish pieces of sponge. Wet the sponges and wring them out until they're dry. Place one piece of sponge under each corner of the serger machine. The sponges will cushion the vibrations and keep your machine steady. No more bouncing!

This is a simple but effective tip for keeping a serger steady. It can also be used to steady other types of machines, including your everyday sewing machine.

Friday, March 30, 2012

How to Organize Your Sewing Supplies, Part 1

It's finally spring around here and I'm doing my annual spring cleaning. In  my sewing area, this means tidying up and organizating any sewing supplies and materials that have migrated over the past few months. Buttons kept in odd locations. Scissors left on the table just because it's easier to leave them there. Fabric that ends up piled instead of stored properly. All of these things need to be put away and organized properly.
Everyone has their own unique was of organizing a sewing room. But there are a few tips that can make the process easier and help you to find what you need when you need it.
  1. Keep buttons in clear jars according to color so you can find them in short order. Also consider organizing fabrics and thread by type and color. I also use binders and expanding folders to hold patterns and magazines that relate to sewing. It's better than keeping all these things scattered around the room. I also like to keep those little pieces that came with the sewing machine in little plastic bags so nothing gets lost.
  2. Fabrics are best stored out of direct sunlight to prevent fading and other damage. But don't seal them in plastic containers or you could allow mold or mildew to grow. Instead, choose something that allows air to circulate, such as a cabinet. Or consider hanging them on dowels or towel rods, but keep them out of the sun.
  3. If you have an old entertainment unit that you're not using, considering converting to hold your sewing supplies and fabrics. Most of them already have drawers and cabinets, so very little has to be done to use it for sewing materials. Also consider plastic drawer units on rollers. These are versatile and handy to have around.
  4. Try to put everything back in its place at the end of the day. Put all your sewing notions and supplies in their bins or cases and make sure everything has a regular storage space. This makes things easier to find the next time.
  5. If you like to hang things, invest in some brackets for the walls. You can hang whatever you need for however long you need to hang it. This work especially well if you like to store sewing materials in tote bags.
  6. Keep a tray or basket on your work table to hold the items you're currently using. This way, if you stop mid-project, these items will be readily accessible the next time you sit down.
There are many other things you can do to keep your work space organized. Use a method that works for you and try not to be constantly changing everything or you'll never remember where you put anything!

Friday, March 23, 2012

OLFA 45mm Ergonomic Rotary Cutter Review

Okay, I'll admit it. I'm a little slow to try new products. I like the old fashioned way of doing thing. Slow but reliable, the old fashioned way gets it done every time. But I received an OLFA 45mm Ergonomic Rotary Cutter for my birthday this year, and I love it. The slow snipping with scissors is a thing of the past for me now. Instead, I use my new toy.

This product features a blade constructed from the highest quality tungsten steel, so it never fails to do the job. Its precise cuts are perfect for cutting out many pieces needed for sewing, especially if those pieces have straight edges. But I've also used my OLFA rotary cutter for curved edges. It cuts through multiple layers of fabric and can also be used on leather and vinyl, which did indeed impress me. I've also used it for things other than sewing. All in all, I love this product. It lets me fly through projects as a speed I've never enjoyed.

The best thing about this neat little tool? I also received a selection of blades. I have a straight blade, but I also have a pinking blade, a scallop blade, and a wave blade. Perfect for most projects. And there are other blades I can add as well. I highly recommend this product to novice and experienced crafters alike.

Thursday, March 8, 2012

Items Will Be Listed for Sale

Welcome to Aislin's Designs! This site will serve as inventory for pre-made items and a catalogue of custom items. Pre-Made items that are being sold will be listed for sale here. If you're interested in purchasing an item or have any questions about the items listed, please contact me at the e-mail address to the right.

Items can be shipped to most locations in the world, so let me know what country you're in and I will get you a shipping quote. Due to the various sizes and weights of the items, there is not one standard shipping rate. All items are shipping by regular mail, so take this into account when ordering.

All purchases must be paid for using Paypal. An invoice will be sent do the e-mail address of your choosing. Please indicate your Paypal e-mail address when expressing your desire to purchase an item. Shipping charges will be disclosed before the invoice is sent. Items will be shipped once full payment is cleared and received.